TongRo Academy: How to Create Natural Light Indoors
- TongRo Images

- Jun 29, 2023
- 3 min read

Naturality · coziness · smoothness⋯. These are some of the impressions you could get from the images that have utilized natural lighting. Natural lighting has been at the center of the attention of photographers and clients due to its unique, relaxing atmosphere. Social flow could be another factor in its popularity. From ‘well-being’ and ‘eco-friendliness’ to ‘sustainable development’; the dream of co-existence between humanity and nature has considerably influenced visual culture.
Accordingly, to create images that hold the impression stated above, utilizing natural lighting as much as possible is the best choice. However, sometimes you might have to produce images at places with no natural lighting, such as an underground studio. What would be the best solution in this scenario?
The first step is analyzing the characteristics of natural lighting. Think of the Sun rising and setting throughout the day; the brightest and the darkest places change as time goes by. Apply this while arranging the lighting – place more than two lighting with uneven brightness to create the depth of the shade. Nevertheless, placing strong lighting in dark spaces would produce images with unnatural, dramatic impressions just like the spotlight on the dark stage. Therefore, putting the main light source with just the right amount of strength so that the object’s detail could stand out smoothly as a center and then putting the other lighting with weaker strength to support.
With the technique of ‘filling’, directing the light onto the ceiling or wall so that it could bounce back evenly with lighting and its accessories such as a simple reflector to vitalize objects’ detail, you can still reach the goal to a certain extent. Still, if your studio is spacious enough, use modifiers including softbox and umbrella to adjust the amount and the strength of lighting. Additionally, you can add story-telling details by attaching ‘gobo’ with the shape of window frames or branches.


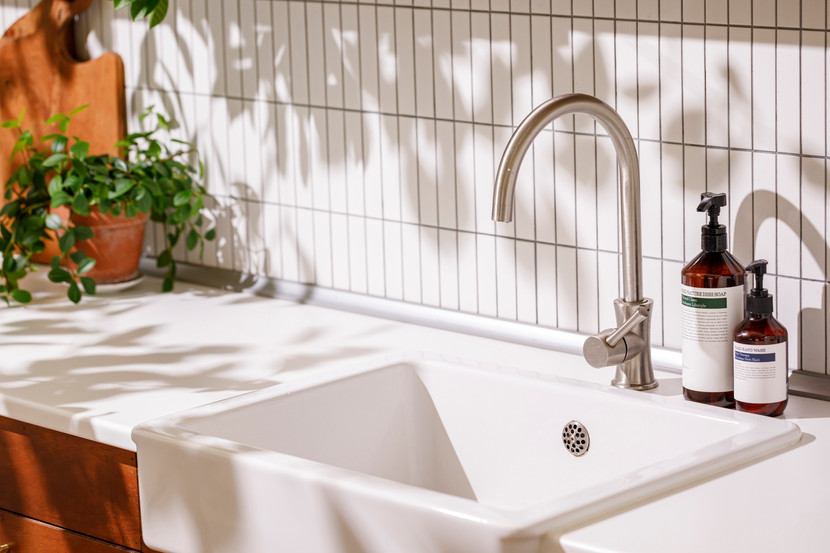
For a better explanation, we have prepared some of the images that are created with entire artificial lighting that gives the impression of natural lighting, created by TongRo Images’ production team. Respectively, these three images belong to their own categories. Though, from the point of technique, they are very similar to each other.
First, there are the outstanding shades. Since an overly ‘clean’ frame without any shade would seem synthetic, the production team placed a carved foam board or plant between the clear, straight LED lighting and the object as a gobo in order to create a ‘realistic’ shade.
Another reason why the three images shown as examples could be produced on an even tone is due to the placement and utilization of lighting. For the placement, the main lighting is set 45 degrees from the upper left while the fill light with the softbox is facing each other regardless of camera angles. The ratio of the brightness and exposure does contribute too; the ratio of the brightness between main and fill lighting stays between 10:3 to 2:1 and for the exposure, f/1.0 to f/1.5.
How did you like our second article introducing the know-how of TongRo Images’ production team? Certainly, keeping in mind that natural lighting can vary due to the elements – such as time of the day, weather, and latitude – therefore it can be produced with numerous combinations would help you to create images with wider range of expression. Refer to the youtube video below that shows the backstage of the ‘Little Forest’ and try to come up with your own combination for natural lighting.


Comments